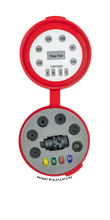
The comprehensive InSight™ Deluxe Peep Kit includes patented anti-glare technology housing with two (2) string angles, four (4) interchangeable lenses, six (6) apertures and free installation tool.
Our InSight Deluxe Peep Kit is the last all-inclusive kit you will ever need. With our Light Baffling Technology in our 14 grain housing, you will eliminate all glare due to our aerospace anti-glare technology that produces a field of view with zero distortions. This housing is machined with both 37.5 and 45 degree string angles.
This kit includes:
InSight Peep Housing, six (6) apertures (1/32″, 3/64″, 1/16″, 3/32″, 1/8″, 5/32″), four (4) clarifying lenses (A, B, C, D), aperture installation tool, and a protective case.
The InSight Peep System Instructions:
The InSight™ Peep System is made up of four main pieces including the light baffling peep housing, clarifying lens, aperture, and the aperture tool. There are 6 aperture sizes ranging from 1/32” up to 5/32” as well as 4 different clarifier lens strengths to accommodate a wide range of shooting setups. The peep housing can be used with or without a clarifying lens and has two sets of string grooves to better accommodate a wider range of shooters. We recommend installing/removing the apertures using the Hamskea Aperture Tool to avoid possible damage to the aperture.
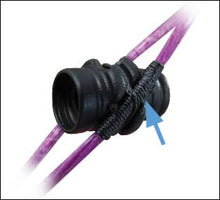
Warning: You must properly tie your peep sight into the string before shooting. Failure to do so may result in personal injury or damage to equipment. Make sure that the peep is firmly held in place with the braided serving material going around the peep circumference and string material as seen below. Click here for instructions on how to tie in your peep.
Installing a Clarifying Lens into the Hamskea Insight™ Peep System
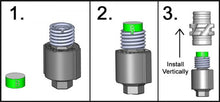
In order to install an aperture and clarifier lens into your InSight™ Peep Housing, you will want to select the specific aperture and clarifier lens that best fits your needs using the reference selection chart below and lay them in order with the aperture tool shown in Picture 1.
You will then want to place the aperture on top of the Hamskea Aperture Installation tool so that both are vertically in line as shown in Picture 2.
When placing the clarifier lens within the raided edge of the aperture, you will want to align the letter of the lens with the slot in the aperture as shown in Picture 2. Aligning these will help to consistently orient/co-register the lens every time it is installed.
The final step is to install the clarifying lens and aperture vertically into the peep housing using the tool to tighten until snug as shown in Picture 3. The aperture should thread in smoothly without the lens becoming bound on the edges of the housing. The peep sight must be held vertically during the installation to prevent any possible damage to the lens.
Warning: If the aperture works loose during shooting, you must reinstall the lens/aperture combo starting at step 1.
NOTE: If this installation procedure is not followed, damage may result to any of the components of the InSight™ peep system and will not be covered under warranty.
Selecting the Proper String Groove:
For the best results, you will want your peep housing to sit as flat as possible at full draw for a straight line of sight towards the target.
Using the chart below, determine your approximate string angle based on Draw Length and Bow Length (Axle to Axle).
Once you have your approximate string angle you will be able to identify if you need either the 37.5º or 45º string grooves on the Standard InSight™ Peep housing, or if the 52.5º string groove present on the Short Draw Peep Housing would best fit your needs.
Note: These values are approximations and string angles may vary slightly depending on bow model and cam size.
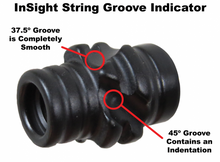
You can easily identify string grooves on the Standard InSight™ Peep Housing by locating the small dimple present in the 45º string angle. The string grooves without the dimple will be 37.5º.


